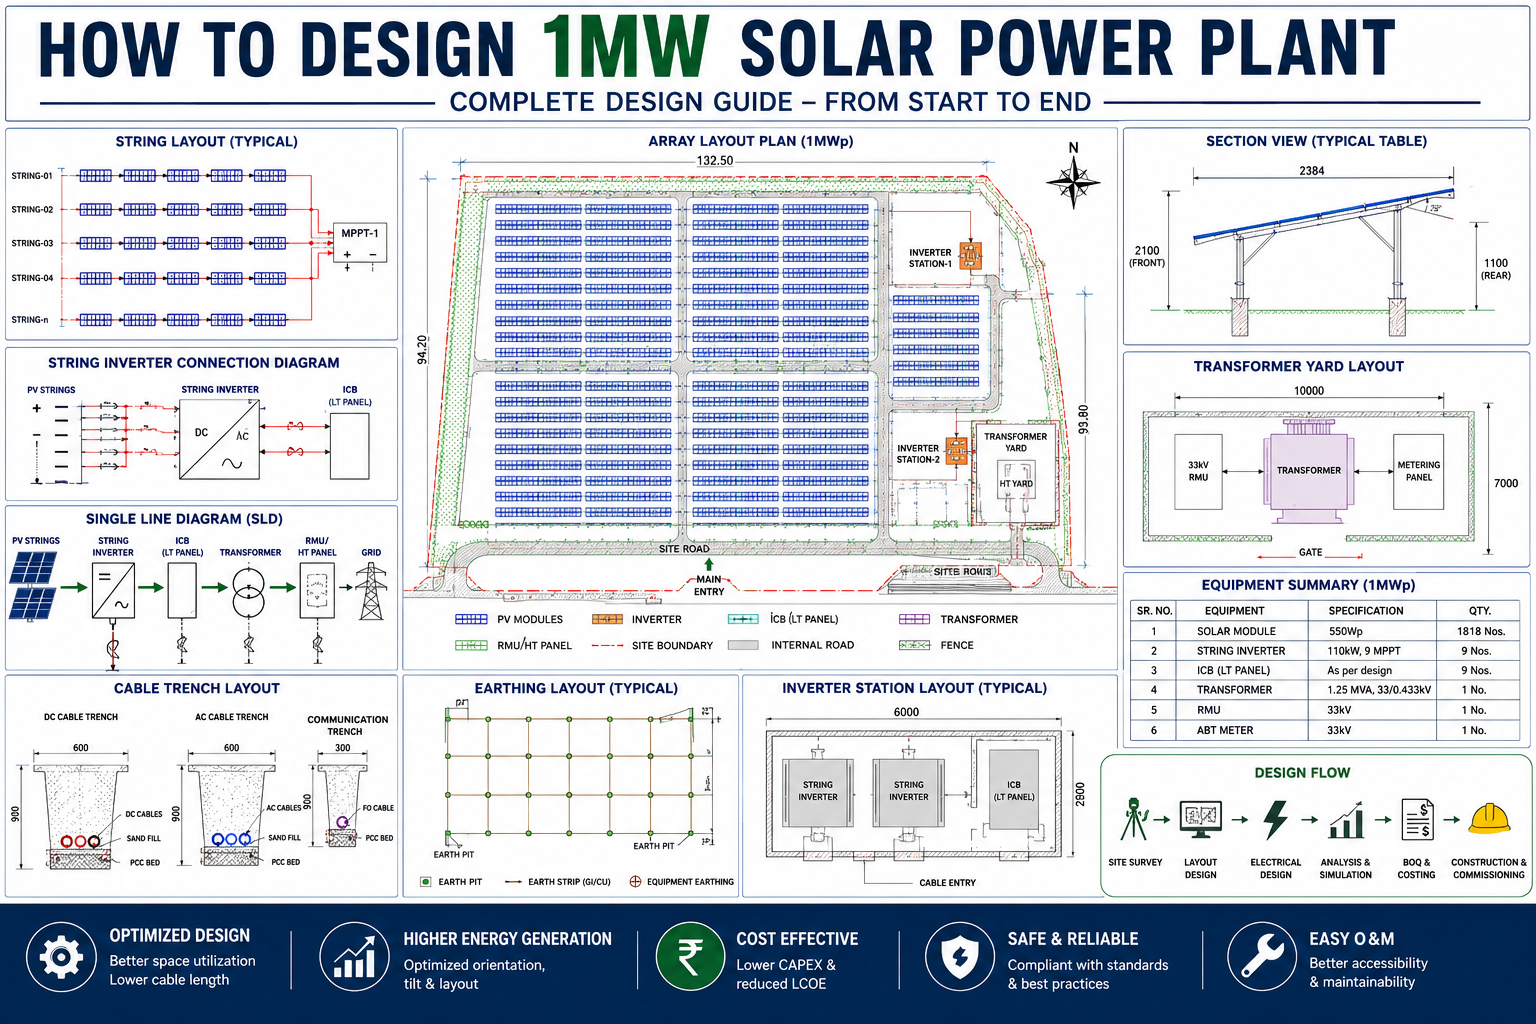
1 MW Ground Mounted Solar Power Plant Design Process
Designing a 1 MW Ground Mounted Solar Power Plant involves a systematic engineering process that ensures maximum energy generation, optimized equipment selection, and long-term system reliability. The design process includes site assessment, energy analysis, PV module selection, inverter sizing, solar array layout, string sizing, cable sizing, transformer selection, earthing design, protection systems, and final commissioning. Following a structured design approach helps reduce project costs, improve plant performance, and ensure compliance with industry standards.
A 1 MW Ground Mounted Solar Power Plant requires detailed engineering, including site survey, module selection, inverter sizing, string sizing, solar array layout, cable sizing, transformer sizing, earthing design, protection systems, and commissioning planning. A properly designed 1 MW Ground Mounted Solar Power Plant delivers maximum energy generation, lower electrical losses, easier maintenance, and improved long-term reliability.
Every stage of the design process directly affects the plant's energy generation, installation cost, long-term reliability, and return on investment. A poorly designed solar plant can lead to higher cable costs, excessive energy losses, difficult maintenance, and lower annual energy production.
In this guide, we'll walk through the complete design process of a 1 MW ground-mounted solar power plant, from the initial site survey to final commissioning. Whether you are a beginner, a solar design engineer, or an EPC professional, this guide will help you understand the complete engineering workflow used in real-world projects.
Step 1: Understand the Project Requirements
Every project starts with collecting the client's requirements and technical inputs.
Before beginning any design work, engineers should understand:
Plant capacity (1 MW AC or 1 MW DC)
Grid interconnection voltage
Land availability
Module preference
Inverter preference
Applicable utility standards
Client specifications
Budget and project timeline
A clear understanding of these requirements prevents design revisions later in the project.
Step 2: Site Selection and Land Assessment
Selecting the right site is one of the most critical decisions.
An ideal location should have:
High solar irradiation
Minimal shading
Stable soil conditions
Easy road access
Nearby grid connection
Good drainage
Low flood risk
Sufficient land area
For a typical 1 MW ground-mounted solar plant, approximately 4–5 acres of land are required, depending on module technology, spacing, and site conditions.
Step 3: Conduct a Detailed Site Survey
A site survey helps engineers understand the existing conditions before design begins.
The survey should include:
GPS coordinates
Property boundaries
Existing roadsTrees and vegetation
Nearby buildings
Overhead power linesWater bodies
Existing utilities
Accurate survey data minimizes construction challenges later.
Step 4: Perform a Topographical Survey
The topographical survey provides detailed information about the site's elevation and contours.
Using this data, engineers can:
Plan grading work
Optimize array placement
Design drainage systems
Position equipmentEstimate earthwork quantitiesWithout an accurate topographical survey, it is impossible to create an efficient plant layout.
Step 5: Analyze Solar Resources
Before selecting equipment, engineers estimate the site's energy potential.
Using software such as PVsyst, they evaluate:
Global Horizontal Irradiance (GHI)
Ambient temperature
Wind speed
Monthly solar radiation
Expected annual energy generation
These values form the basis for the energy yield calculations.
Step 6: Select Solar Modules
The solar module is the heart of the power plant.
When selecting modules, engineers consider:
Module efficiency
Power rating
Temperature coefficient
Mechanical strengthWarranty
IEC certifications
Bifacial or monofacial technology
Higher-efficiency modules reduce land usage and structural requirements.
Step 7: Select the String Inverter
Modern utility-scale projects commonly use string inverters due to their flexibility and ease of maintenance.
Selection criteria include:
Rated AC power
Maximum DC voltage
Number of MPPTsMaximum input current
Conversion efficiency
IP protection rating
Communication protocols
The inverter should match the project's electrical design and future maintenance strategy.
Step 8: Decide the DC/AC Ratio
The DC/AC ratio determines how much DC capacity is connected to each inverter.
A properly optimized ratio:
Maximizes annual energy production
Improves inverter utilization
Reduces project cost
Maintains acceptable clipping losses
The exact value depends on climate, module technology, and project economics.
Step 9: Design the PV String
String design is one of the most important electrical calculations.
Engineers calculate:
Modules per string
Maximum string voltage
Minimum operating voltage
String currentTemperature correction
MPPT compatibility
Every string must operate safely within the inverter's allowable voltage range under all weather conditions.
Step 10: Prepare the Array Layout
The array layout determines where every PV table will be installed.
A good layout considers:
Module orientation
Tilt angle
Row spacing
Maintenance access
Shading
Land utilization
Future expansion
An optimized array layout directly improves plant performance.
Step 11: Create the String Layout
Once the array layout is complete, engineers prepare the string layout.
This drawing shows:
String numbering
Modules in each string
MPPT allocation
Inverter connections
Cable routing
A clear string layout simplifies installation, testing, and maintenance.
Step 12: Select the Inverter Location
String inverters should be installed close to the PV tables they serve.
This reduces:
DC cable length
Voltage drop
Cable cost
Installation time
The typical electrical flow is: PV Modules → String Inverter → ICB (LT Panel) → Transformer → RMU/HT Panel → Grid
Step 13: Design the DC and AC Cable Network
Cable design includes:
Cable sizingVoltage drop calculations
Current carrying capacity
Cable routingTrench planning
Protection against mechanical damage
Well-planned cable routing reduces losses and installation costs.
Step 14: Design the Earthing and Lightning Protection System
A robust protection system ensures the safety of personnel and equipment.
The design includes:
Earth pitsEarth grid
Equipment earthing
Structure earthing
Fence earthing
Lightning masts
Down conductorsProper earthing also improves the reliability of protection systems.
Step 15: Prepare the Single Line Diagram (SLD)
The SLD is the primary electrical drawing of the plant.
It shows the complete power flow from the solar modules to the utility grid, including all protection devices, transformers, switchgear, metering equipment, and interconnections.
Step 16: Civil and Structural Design
Civil and structural engineers prepare:
Internal road layouts
Drainage systemsCable trenchesEquipment foundationsModule mounting structuresPile foundationsSteel connection detailsThese drawings ensure the plant is durable and safe under site-specific environmental conditions.
Step 18: Prepare the Bill of Quantities (BOQ)
The BOQ lists every material required for the project, including:
Solar modulesInverters
Structures
Cables
Switchgear
Transformers
Earthing materials
Civil works
ConsumablesA detailed BOQ supports accurate procurement and cost estimation.
Conclusion:
Designing a 1 MW ground-mounted solar power plant is a multidisciplinary process that combines electrical, civil, structural, and mechanical engineering. From selecting the right site and sizing the equipment to preparing engineering drawings and validating the design through simulations, every decision influences the plant's performance, reliability, and overall cost.
By following a structured engineering workflow and adhering to industry best practices, designers can create solar power plants that are efficient, safe, and easy to construct and maintain. Investing time in detailed planning during the design phase leads to lower lifecycle costs, higher energy production, and a more successful project.
Whether you are a student entering the solar industry, a design engineer, or an EPC contractor, mastering this complete design process will help you deliver professional, utility-scale solar projects with confidence.
1 thought on “How to Design a 1 MW Ground-Mounted Solar Power Plant: Complete Engineering Guide”